Custom Compilation of the Linux Kernel
By Scott Brady
Contents
- What is a Kernel?
- Why should I Custom Compile my Kernel?
- How do I Custom Compile my Kernel?
- Overview
- Determining what Hardware you have
- Installing Development Libraries
- Installing the Kernel Source
- Configuring your Kernel
- To Module or not to Module?
- Compiling your Kernel the Debian Way
- Compiling your Kernel the Normal Way
- Compiling and Installing Modules
- Creating a RAM Disk
- Copying the Kernel
- Bootloader Configuration
- Rebooting your System
- Your New Kernel
- Conclusion
- Addendum: Using a Kernel Compilation to Stress Test your System
What is a Kernel?
A kernel is the heart of an operating system. It is a piece of software that securely controls access to hardware. The kernel manages memory, schedules execution of processes, allows for concurrent execution of processes, and provides an abstraction layer between the hardware and userspace software. What this means in simpler terms is that the kernel acts as a traffic cop for processes (programs).
 -------------------  _
|     Programs      |  \
|-------------------|   > Userspace
|       Shell       | _/
|-------------------|
|      Kernel       | - Kernelspace
|-------------------|
|     Hardware      |
 -------------------
Diagram of the Kernel in relationship to hardware and userspace programs.
Why should I Custom Compile my Kernel?
Your kernel is just another program running on your system. Like any program, if you compile it specifically for your hardware it will run faster than a program compiled to run on generic hardware. Custom compilation also gives you the opportunity to leave out features you don't need. The Linux kernel has drivers for thousands of pieces of hardware. Custom compilation allows you to compile in only the parts of the kernel you need for your hardware and to leave out the rest. That leaves you with a smaller and faster kernel.
Given that your kernel is the hub of operations in your operating system, a small improvement in performance can make your computer much more responsive. A custom compiled kernel will typically boot faster because it won't be loading unnecessary drivers and will perform better in high load situations. While desktop users who care about performance will notice the benefits of a custom compile kernel, a medium or high-load server will greatly benefit from the speed enhancements.
How do I Custom Compile my Kernel?
Overview
Compiling your kernel is very easy. The only part that requires time and consideration is the kernel configuration. During the kernel configuration you will have to select what drivers and features you want compiled into the kernel. Fortunately, you can usually start with the configuration for your current kernel and work on customizing it from there.
Once you're done configuring your kernel, it only takes a couple commands to compile your new kernel. Once the compilation is finished, you simply have to reboot your computer and select the new kernel from your boot loader's menu. Your newly compiled kernel will now boot!
Determining what Hardware you have
Because you only want drivers compiled into the kernel that you will actually use, you need to determine what hardware you have. The best way to determine what hardware you have is to open up the case and write down the chipsets of all the important components. You can then do a Google search to find out which drivers in the Linux kernel support your hardware. If you are too nervous opening up your computer or don't have the time or patience, you can gather most of the information from your running system. The lshw command will produce a text-based hierarchical listing of the hardware in your system. If this program isn't installed on your system and you're running Debian, you can install it with the following command:
su root
aptitude install lshw
If lshw isn't available on your system, you can use the following commands to obtain some of the same information:
- CPU: cat /proc/cpuinfo
- Memory: cat /proc/meminfo
- PCI: lspci
OR
cat /proc/pci
To discover any remaining hardware details you'll have to open the case of your computer and take a look inside.
Here is a list of important hardware information that you should take note of:
- CPU -- manufacturer (AMD/Intel/etc.) and model
- Amount of Memory
- Type of Disks (SCSI/IDE/SATA)
- Disk Controller -- type (SCSI/IDE/SATA) and model
- Sound Card
- Network Card
Installing Development Libraries
Debian has a special program for compiling kernels that will produce a compiled kernel packaged in a Debian package file. Installing the package kernel-package will install this special program and its supporting programs. We can install the kernal package programs with the following command:
su root
aptitude install kernel-package
Because kernel-package depends on the GCC compiler, if you haven't already installed C development libraries the Debian package management system will install them for you.
If you aren't using Debian you will have to follow your distribution's instructions for installing development libraries. Additionally, you won't be able to create a package that contains your compiled kernel.
Installing the Kernel Source
The Debian Way
Debian provides prepackaged kernel source that is identical to the source Debian developers use to compile their generic kernels. The prepackaged source contains any patches that the Debian developers have applied to the source in order to fix bugs or backport features. You can find the latest version of the kernel source by running the following commands:
su root
aptitude update
apt-cache search kernel-tree
Example output:
$ apt-cache search kernel-tree
kernel-tree-2.4.27 - Linux kernel source tree for building Debian kernel images
kernel-tree-2.6.8 - Linux kernel source tree for building Debian kernel images
The above command will return the latest kernel source package. You can then install the kernel source package with the version number that the above command returned:
su root
aptitude install kernel-tree-2.6.8
As you can see, the version of the kernel source in Debian Sarge at the time this article was written is 2.6.8. You will need to use whatever package name was returned when running the apt-cache search.
The Normal Way
If you aren't running Debian you can download the Linux kernel source code from kernel.org. From the main page of the site you will see a list of current kernels that are available for download. Older kernels are also archived on the site and available for download. Once you've selected the version of the kernel you want to download, copy the URL or write it down and download the source archive with the wget command:
su root
wget -P /usr/src ftp://ftp.kernel.org/pub/linux/kernel/v2.6/linux-2.6.8.tar.bz2
The P option tells wget to download the file to the /usr/src directory. The URL you use will be different if you are downloading a different version of the kernel.
Extracting the Source
You now need to change into the directory that the source code archive was installed and execute the tar command to extract the source:
su root
cd /usr/src
tar jxvf kernel-source-2.6.8.tar.bz2
OR, non-Debian:
tar jxvf linux-2.6.8.tar.bz2
The j option tells tar to decompress the bzip2 archive, the x option tells tar to extract the archive, the v option tells tar to be verbose, and the f option tells tar that what follows is the name of the file to perform the operations on. Replace 2.6.8 with the kernel version you installed.
The compressed 2.6 Linux kernel source is about 36MB. The uncompressed and extracted kernel source is around 236MB. After compilation the size of the source directory will grow to around 314M.
Configuring your Kernel
You first need to cd into the directory where your kernel source code lives. If you've followed all the steps above, your kernel source will be in the following directory:
cd /usr/src/kernel-source-2.6.8
OR, non-Debian:
cd /usr/src/linux-2.6.8
Replace 2.6.8 with the kernel version you installed.
To make configuration of your kernel as easy as possible, it's a good idea to start with the configuration for your current kernel. The kernel configuration file should reside in the /boot directory. First, determine the version of your current running kernel:
uname -r
You can then do an ls of the /boot directory to determine which configuration file corespondents with your current running kernel:
ls /boot | grep config
Example output:
$ ls /boot | grep config
config-2.6.8-2-386
config-2.6.8-2-686
You now want to copy that configuration file into it's proper location as the configuration file for the kernel source you are about to configure:
su root
cp /boot/config-2.6.8-2-686 .config
Replace config-2.6.8-2-686 with the proper configuration file that you determined from the steps above.
You are now ready to run the configuration front-end. You have the choice of different configuration modes. Four of the most commonly used modes are:
- oldconfig
Linear series of questions. If you make a mistake you have to start over! - menuconfig
Curses based configuration with menus. Good for systems without X and for non-X-forwarding SSH connections. - xconfig
QT-based (like KDE) configuration. - gconfig
GTK-based (like Gnome) configuration.
Here are some screen shots of the three graphical configuration modes:
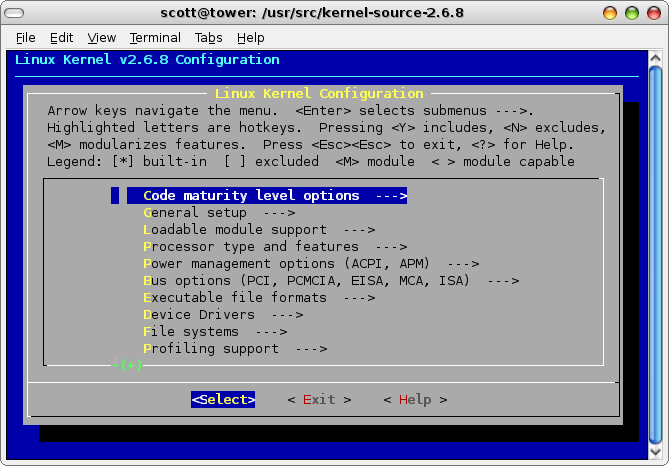
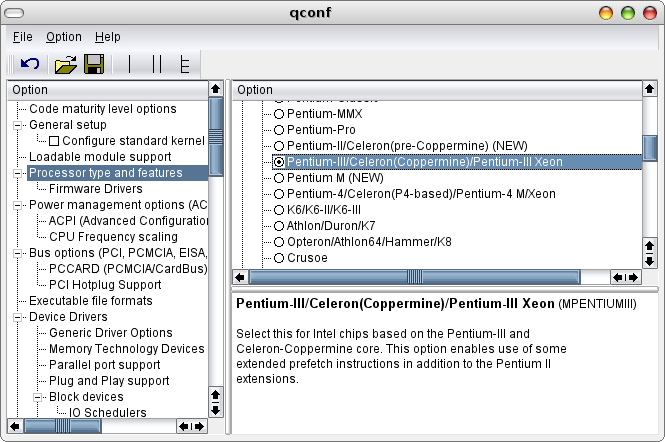
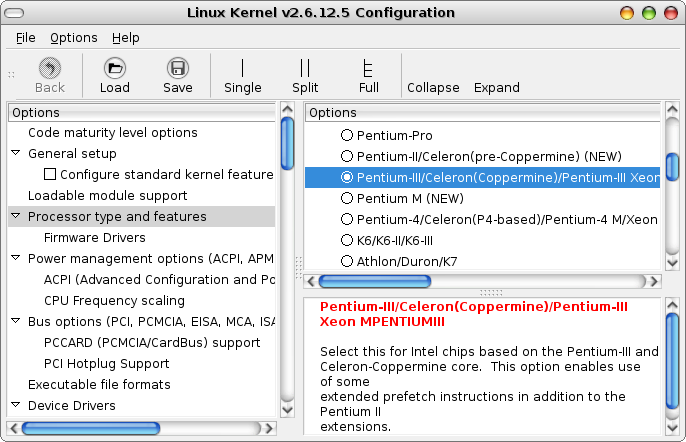
If you're a GUI-oriented person I recommend you use either the xconfig or gconfig configuration modes. xconfig will be familiar to KDE users and gconfig will be familiar to Gnome users.
All three graphical configuration modes require that you have development libraries installed in order to run them. Here is a list of the Debian packages that correspond with each configuration mode:
- menuconfig: libncurses5-dev
- xconfig: libqt3-mt-dev
- gconfig: libgtk2.0-dev libglib2.0-dev libglade2-dev
For example, if I wanted to use gconfig I would need to run the following command:
su root
aptitude install libgtk2.0-dev libglib2.0-dev libglade2-dev
Once you have the correct development library installed for the mode you want to use you can run the configuration command. Here are the commands to start configuring your kernel in GUI mode:
su root
make xconfig
OR
make gconfig
Here's something important you should note about the GUI configuration program:
For each option, a blank box indicates the feature is disabled, a check indicates it is enabled, and a dot indicates that it is to be compiled as a module. Clicking on the box will cycle through the three states.
The functionality described above applies to both the xconfig and gconfig modes and isn't immediately obvious the first time you use the program. You can find the above instructions and more in the Help -> Introduction menu of both modes.
This is the point in the compilation process when all the information you gathered about your hardware comes in handy. You will need to navigate all the menus and select drivers that are needed for your hardware. As a general rule you can leave a setting the way it is unless you know you don't need a driver that is compiled in or need a driver that's not compiled in.
To Module or not to Module?
Many drivers in the Linux kernel can be compiled directly into the kernel or compiled as modules. This leaves you with the quandary of which option to pick. There really is no straight answer to this question. Drivers that are compiled into the kernel don't have to be loaded and may speed up your system by an imperceptible amount. Some people argue that minimizing the amount of code in the kernelspace will increase stability, but a rouge kernel module is probably just as likely to take down your system as a driver compiled into the kernel.
If you're looking for the easiest solution, then just leave everything that's a module the way it is and everything that's not a module the way it is. If you need to select a driver that wasn't compiled in before, compile it in as a module if that option is available. If a driver can't be compiled as a module then thank the kernel gods you didn't have to decide!
Compiling your Kernel the Debian Way
Now that your kernel is configured you can finally start the compilation process! First you need to make sure the source code directory is clean:
su root
make-kpkg clean
That command isn't needed if this is the first time you're compiling your kernel, but it's a good habit to always clean the directory before compiling. You can now issue the command to start the compile:
su root
make-kpkg --initrd -rev hostname.N.n kernel_image
Replace hostname with the hostname of the computer you are compiling your kernel for. Also change N.n to the revision number you want to use (e.g. 1.0). The rest of the options to the command can be left as they are.
If you want to time how long your kernel compilation takes, you can precede the make-kpkg command with the time command:
su root
time make-kpkg --initrd -rev hostname.N.n kernel_image
This is the point in the process where you sit back with a cup of coffee and wait for your compile to finish. The compile time will depend on the speed of your machine and how many drivers you selected to compile into the kernel. Compiling the 2.6 kernel on a 700Mhz machine with 256MB of RAM takes around 45 minutes. Your millage will vary.
Installing the Debian Kernel Package
Once the kernel compile is finished you will be left with a kernel image package in your /usr/src directory. All you need to do now is tell dpkg to install the package with the following command:
su root
dpkg -i /usr/src/kernel-image-2.6.8_tower.1.0_i386.deb
Replace 2.6.8 with the version number of the kernel you compiled and tower.1.0 with the hostname and version number you used.
Rebooting your System
The only way to load the new kernel is to reboot your system. The Debian package that you installed will have created a new entry in your Grub or LILO configuration file. You may want to double check this change to make certain it's to your liking. Once you're satisfied everything is set you can reboot your system:
su root
shutdown -r now
Compiling your Kernel the Normal Way
The non-Debian way of compiling and installing a kernel requires a few extra steps. Instead of relying on the make-kpkg program to handle the intricacies of the compilation process you will have to manually perform the tasks. The first commands to run can be issued all at once as follows:
make dep; make clean; make bzImage
Your shell interpreters commands separated by semicolons as separate commands to be run successively. It starts with the first command and starts the next commands only when the first command has finished.
When the above trio of commands are finished your kernel will be compiled. The length of time the compilation process requires depends on the speed of your system. Your millage will vary.
Compiling and Installing Modules
In addition to compiling the core kernel you must also compile all the modules. The following commands will compile the modules and install them:
su root
make modules; make modules_install
The installation command creates a directory named for the kernel's version in /lib/modules and copies the kernel modules into the new directory. For example, if you are compiling the 2.6.8 kernel it will create a directory called /lib/modules/2.6.8 and copy all the newly compiled modules into that directory.
Creating a RAM Disk
When your kernel is loading it may need to use a module at a critical stage in the boot process. If you compiled your disk controller driver as a module but all the modules are located on the disk, how is the kernel going to ever load the module? The answer is a RAM disk. The RAM disk contains modules that the kernel needs to bring up the rest of the system, like a disk drive. The following command creates a RAM disk for your kernel and installs it in the /boot directory:
su root
mkinitrd -o /boot/initrd.img-2.6.8 2.6.8
Replace 2.6.8 with the version of the kernel you compiled.
Copying the Kernel
Now that your kernel is compiled you can finally install it in the boot directory. The following commands will copy over the kernel image and the kernel's system map:
su root
cp arch/i386/boot/bzImage /boot/vmlinuz-2.6.8
cp System.map /boot/System.map-2.6.8
Replace 2.6.8 with the version of the kernel you compiled. As a final step you should copy over the configuration file you used to compile the kernel:
su root
cp .config /boot/config-2.6.8
Replace 2.6.8 with the version of the kernel you compiled.
Bootloader Configuration
Your last step in the compilation process is to configure your boot loader to load your newly compiled kernel.
Grub
Add the following entries to the bottom of your /boot/grub/menu.lst configuration file:
title Linux Kernel 2.6.8
root (hd0,0)
kernel /boot/vmlinuz-2.6.8 root=/dev/hda1 ro
initrd /boot/initrd.img-2.6.8
Replace 2.6.8 with the version of your compiled kernel and change both references to the root device to match your configuration. If you aren't certain what those values should be look at the values in the entry for your current running kernel.
LiLo
Add the following entries to the bottom of your /etc/lilo.conf configuration file:
image=/boot/vmlinuz-2.6.8
label=Linux_Kernel_2.6.8
root=/dev/hda1
initrd=/boot/initrd.img-2.6.8
read-only
Replace 2.6.8 with the version of your compiled kernel and change the reference to the root device to match your configuration. If you aren't certain what that value should be look at the value in the entry of your current running kernel.
Very Important Step: Make certain you run the /sbin/lilo command after editing the lilo configuration file. Your system may not boot if you don't run the command! Again, after editing the lilo configuration file, run the following command:
su root
/sbin/lilo -v
The v option tells lilo to be verbose.
Rebooting your System
The only way to load the new kernel is to reboot your system. Once you've double checked that you've followed all the steps and are satisfied that everything is in order you can reboot your system:
su root
shutdown -r now
Your New Kernel
If you compiled in all the drivers you needed and followed the directions properly your new kernel should boot just fine. If you do find that something isn't working properly you can always boot into your old kernel, go back to tweak the kernel configuration and recompile.
Conclusion
As you can see from this article, the hardest part of a kernel compilation is selecting which drivers you want in your kernel. Once you've gone through that process once, future compiles of newer kernel versions won't be nearly as time consuming. If you're running kernel version 2.6.n and version 2.6.n+1 is released, all you have to do is download the new kernel source and copy over the configuration file from the previous version to the new version. For example:
su root
cp /usr/src/kernel-source-2.6.8/.config /usr/src/kernel-source-2.6.9/.config
You should note that this will only work for the same major version number of kernel. You would not want to use a .config file from 2.4 with 2.6. When compiling a new major kernel version for the first time you should always run the configuration program.
Good luck with your kernel compilations!
Addendum: Using a Kernel Compilation to Stress Test your System
Kernel compilations are a great way to test stress test a new system. If you just bought a new computer or installed some new hardware, like a new disk drive, you probably want to test the hardware before you start relying on it. Here are the steps to stress test your system:
- Download any kernel version and extract the source
- Run the configuration program (make menuconfig) and tell it to save the configuration file (don't bother changing any settings, the defaults will work just fine)
- Manually run the compile once with "make dep; make clean; make bzImage" before you start the automated compiles
- Save the following script somewhere on your system and execute it from the kernel source directory:
#!/bin/sh
# Written by Frank Sergeant
# Found at: http://pygmy.utoh.org/stress.txt

passnum=1

while [ ${passnum} -le  $1  ]
do
  echo -ne 'starting compile #'$passnum at $(date)\
    | tee -a $HOME/stress.summary

  # perform the compile
  (make dep; make clean; make bzImage)  2>&1 > /dev/null

  if [ $? -eq 0 ]   # test result code from running the compile
  then
    echo ' -- success --'  | tee -a $HOME/stress.summary
  else
    echo ' -- failure -- '  | tee -a $HOME/stress.summary
  fi

  # increment the pass number
  passnum=$((passnum+1))

done
Example:
cd /usr/src/kernel-source-2.6.8
~/bin/stress 1000
Come back in a few days or a week and check to make sure all the kernel compiles succeeded. If any of the compiles failed then you'd better replace the bad hardware before you start using the system!